
Before writing your first React component, you need a proper development environment. React itself is a JavaScript library, but a modern React application also relies on tools such as Node.js, npm, a development server, and a build tool.
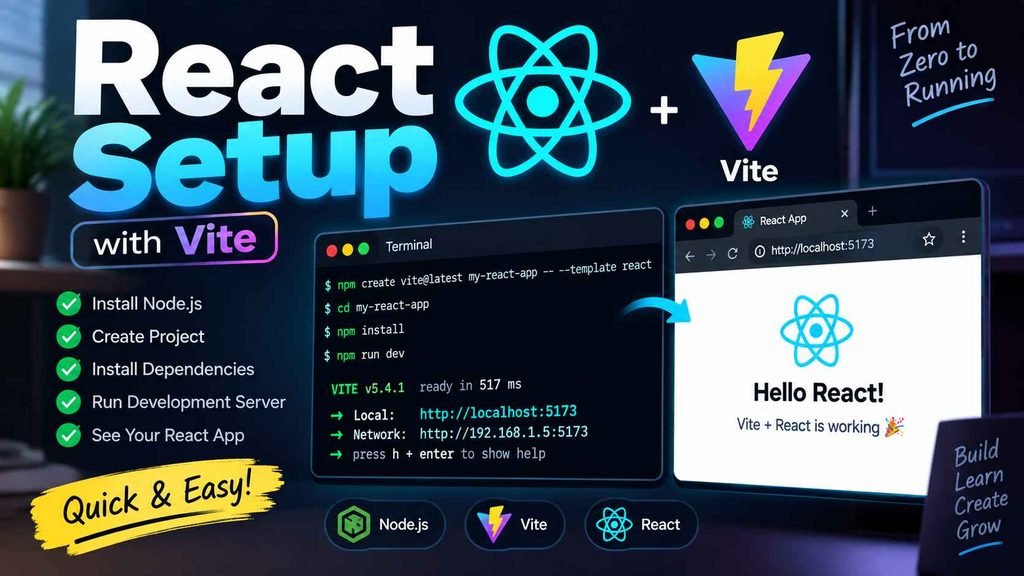
In this chapter, you will learn how to set up React from the beginning, install Node.js, understand npm and npx, create a React project using Vite, explore the project structure, understand important files such as package.json, main.jsx, and App.jsx, run the application locally, and finally create a production build.
By the end of this chapter, you should be able to create a React project from scratch and understand what each important file and command does.
Modern React setup: This guide uses Vite because Create React App has been deprecated and is no longer recommended for starting new React applications.
React Prerequisites
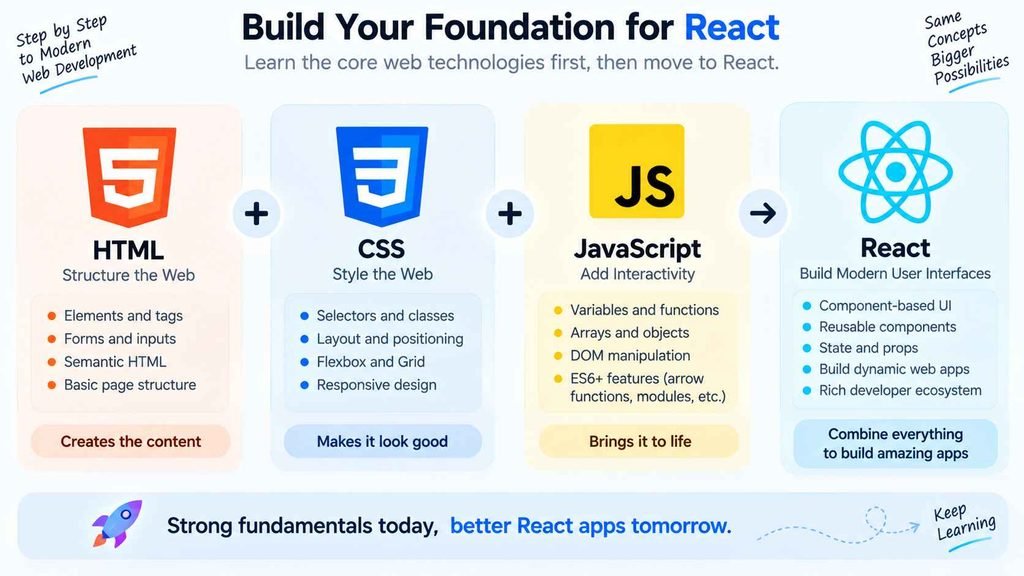
React is built with JavaScript, so having a basic understanding of JavaScript and web development will make learning React much easier.
You do not need to be an advanced JavaScript developer before starting React, but you should be comfortable with the fundamentals.
What You Should Know Before Learning React
| Prerequisite | What You Should Understand |
|---|---|
| HTML | Elements, attributes, forms, semantic HTML |
| CSS | Selectors, classes, layout, Flexbox, basic responsive design |
| JavaScript | Variables, functions, arrays, objects, conditions |
| ES6+ | Arrow functions, destructuring, spread operator, modules |
| DOM | Basic understanding of how web pages are manipulated |
| Terminal | Running basic commands such as cd, npm, and node |
| Code Editor | Ability to create and edit files |
You should also understand how a basic website works. A browser loads HTML, applies CSS for presentation, and executes JavaScript to provide interactivity. React adds another layer by allowing you to build the user interface using reusable components.
Important JavaScript Concepts for React
Before moving deeply into React, make sure you understand concepts such as:
- Variables using
letandconst - Functions and arrow functions
- Objects and arrays
- Array methods such as
map(),filter(), andfind() - Destructuring
- Spread syntax
- Template literals
- Import and export
- Promises and asynchronous JavaScript
- Basic DOM concepts
For example, React components frequently use JavaScript functions:
function Welcome() {
  return <h1>Welcome to React</h1>;
}
Understanding JavaScript functions will make this code much easier to understand because a React function component is essentially a JavaScript function that returns UI.
Do You Need to Know TypeScript?
No.
You can learn React using JavaScript first and introduce TypeScript later. Vite provides templates for both JavaScript and TypeScript React projects.
Install Node.js
One of the first things you need for local React development is Node.js.
Node.js is a JavaScript runtime that allows JavaScript code to run outside the browser. When working with modern React projects, Node.js is used to run development tools, package managers, build tools, and other JavaScript-based tooling.
Installing Node.js also gives you access to npm, the Node Package Manager.
Modern React development tools such as Vite require a sufficiently recent Node.js version. The current Vite documentation lists Node.js 20.19+ or 22.12+ as supported requirements, with some templates potentially requiring higher versions.
Download Node.js
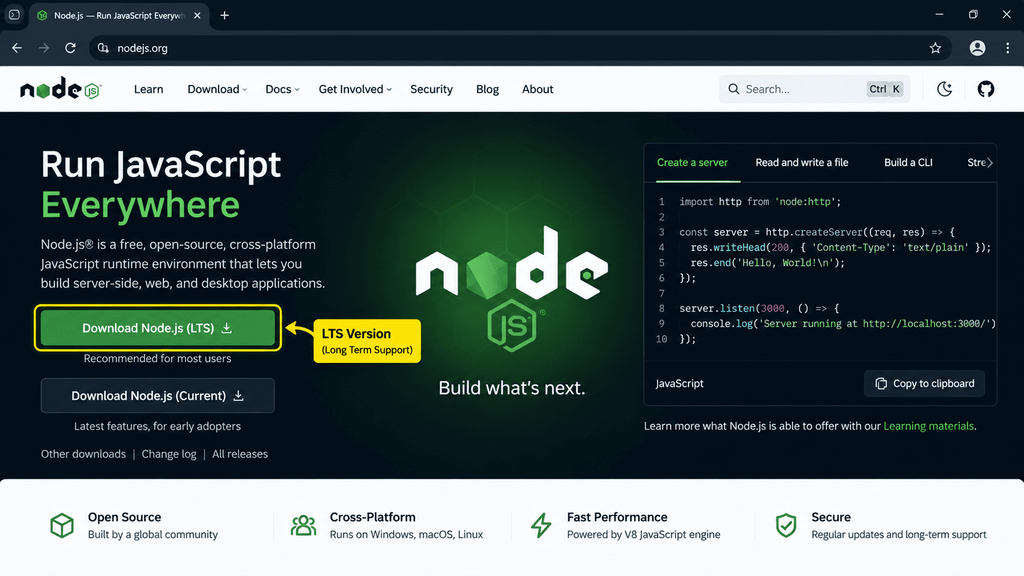
Download Node.js from the official Node.js website:
For most beginners, using the current LTS version is a good choice because LTS releases are intended for stable, long-term use.
Installing Node.js on Windows
After downloading Node.js:
- Open the Node.js installer.
- Accept the license agreement.
- Keep the default installation options unless you have a specific reason to change them.
- Complete the installation.
- Restart your terminal or code editor if it was already open.
Once the installation is complete, open Command Prompt, PowerShell, Windows Terminal, or the terminal inside your code editor.
Run:
node -v
You should see a version number similar to:
v22.x.x
The exact version will depend on the Node.js release installed on your computer.
Next, check npm:
npm -v
You should also receive an npm version number.
Why Check the Versions?
Checking the versions confirms that Node.js and npm are correctly installed and available through your system’s PATH.
If the terminal says that node or npm is not recognized, restart the terminal. If the problem continues, Node.js may not have been installed correctly or its executable may not be available through the system PATH.
Reference:
Node.js Downloads
npm and npx
After installing Node.js, you will frequently use two commands:
npmnpx
Although they are related, they serve different purposes.
What Is npm?
npm stands for Node Package Manager.
It is commonly used to:
- Install packages
- Remove packages
- Update packages
- Manage project dependencies
- Run scripts defined in
package.json
For example:
npm install react
This tells npm to install the React package into your project.
Another common command is:
npm install
This reads the project’s dependency information and installs the required packages.
You can also use:
npm run dev
to execute a development script defined in package.json.
What Is npx?
npx is a command provided with npm that allows you to execute packages without necessarily installing the command globally.
For example:
npx vite
can execute the Vite command.
You will also see commands such as:
npm create vite@latest
This uses npm’s package execution capabilities to run the Vite project scaffolding tool.
npm vs npx
| Command | Main Purpose |
|---|---|
npm install | Install dependencies |
npm install package-name | Install a specific package |
npm uninstall package-name | Remove a package |
npm update | Update packages |
npm run dev | Run a project script |
npx command | Execute a package command |
npm create ... | Run a project creation tool |
A Simple Example
Suppose you have a React project and want to install a package called axios.
You would use:
npm install axios
But if you want to execute a project-generation tool, you may use a command such as:
npm create vite@latest
Understanding the difference between installing packages and executing tools will become increasingly important as your React projects become larger.
Create a React App
There are several ways to start a React application.
Historically, many tutorials used Create React App, often abbreviated as CRA:
npx create-react-app my-app
However, this approach should not be used for new React projects today because Create React App has been deprecated. React’s official documentation recommends using a modern framework when appropriate or building from scratch with a suitable tool such as Vite when a framework is not required.
Therefore, for this React course, we will use Vite.
Why Use Vite?
Vite provides a modern development environment with:
- Fast development server startup
- Fast Hot Module Replacement
- Modern JavaScript support
- Production build tooling
- React templates
- Simple project configuration
Vite’s documentation describes it as a frontend build tool designed to provide a faster and leaner development experience.
React with Vite
Vite is one of the most common ways to create a React project from scratch.
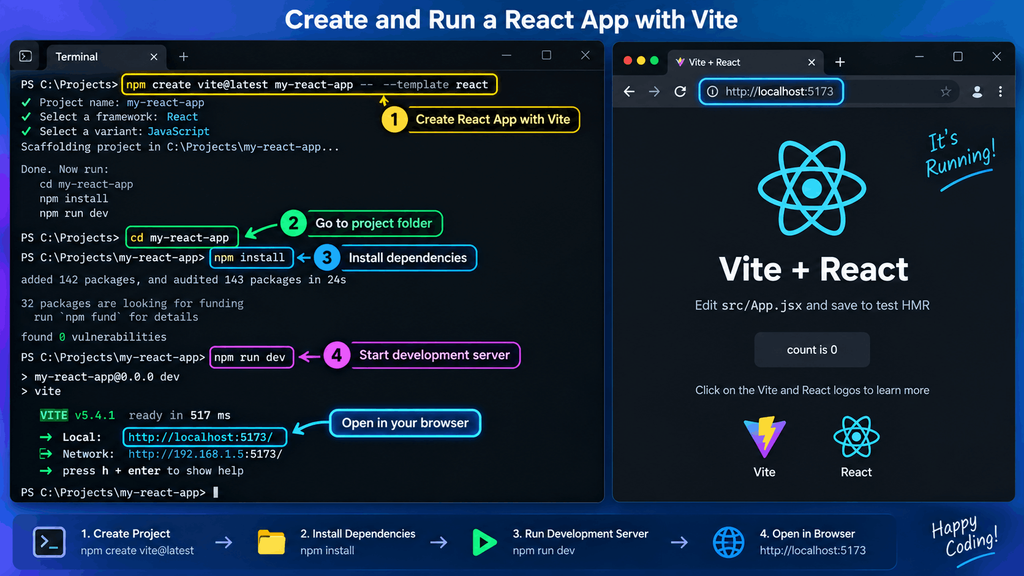
The basic command is:
npm create vite@latest
After running the command, Vite will ask you several questions.
For example:
Project name:
> my-react-app

Select a framework:
> React

Select a variant:
> JavaScript
You can also create the project directly from the command line.
npm create vite@latest my-react-app -- --template react
Then move into the project directory:
cd my-react-app
Install the project’s dependencies:
npm install
Start the development server:
npm run dev
Vite will normally provide a local address such as:
http://localhost:5173/
Open that address in your browser.
You should see your React application running.
Vite officially supports React templates including JavaScript and TypeScript variants.
Complete React + Vite Setup
For a JavaScript React project, the complete process is:
npm create vite@latest my-react-app -- --template react

cd my-react-app

npm install

npm run dev
This is one of the most important command sequences to remember when starting a new React project.
What Each Command Does
| Command | Purpose |
|---|---|
npm create vite@latest | Starts the Vite project creation tool |
my-react-app | Defines the project name |
--template react | Selects the React template |
cd my-react-app | Opens the project directory |
npm install | Installs project dependencies |
npm run dev | Starts the development server |
React Project Structure
After creating a React application with Vite, open the project folder in your code editor.
A typical project will contain a structure similar to this:
my-react-app/
│
├── node_modules/
├── public/
│
├── src/
│   ├── assets/
│   ├── App.css
│   ├── App.jsx
│   ├── index.css
│   └── main.jsx
│
├── .gitignore
├── index.html
├── package.json
├── package-lock.json
├── vite.config.js
└── README.md
The exact files can change depending on the Vite template and the version used to create the project.
The most important files for beginners are:
src/public/src/main.jsxsrc/App.jsxpackage.jsonindex.htmlvite.config.js
Do not worry if the project initially contains files that you do not understand. You will gradually learn what they do as you progress through React.
Project Structure at a Glance
| File/Folder | Purpose |
|---|---|
node_modules/ | Installed project dependencies |
public/ | Static assets that can be served directly |
src/ | Main application source code |
App.jsx | Main application component |
main.jsx | React application entry point |
index.html | HTML document used by Vite |
package.json | Project metadata, dependencies, and scripts |
package-lock.json | Records dependency versions used by npm |
vite.config.js | Vite configuration |
.gitignore | Files Git should ignore |
package.json
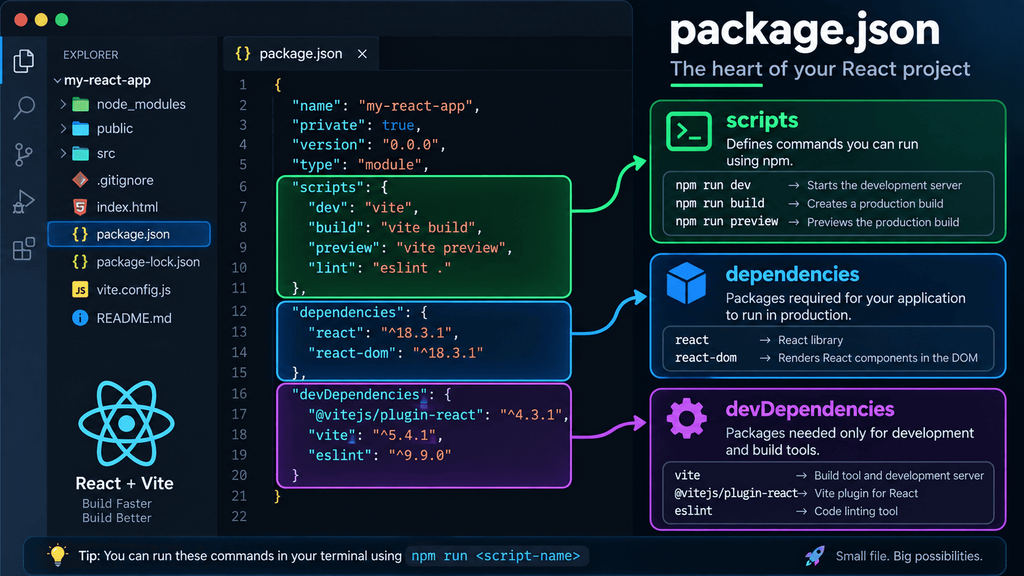
The package.json file is one of the most important files in a JavaScript or React project.
It contains information about the project, its dependencies, and commands that can be executed using npm.
A simplified Vite React package.json may look similar to:
{
  "name": "my-react-app",
  "private": true,
  "version": "0.0.0",
  "type": "module",
  "scripts": {
    "dev": "vite",
    "build": "vite build",
    "lint": "eslint .",
    "preview": "vite preview"
  },
  "dependencies": {
    "react": "...",
    "react-dom": "..."
  },
  "devDependencies": {
    "@vitejs/plugin-react": "...",
    "vite": "..."
  }
}
The exact versions will depend on when you create the project.
Important Sections of package.json
name
"name": "my-react-app"
This defines the project name.
version
"version": "0.0.0"
This represents the current version of your project.
type
"type": "module"
This allows the project to use modern JavaScript modules such as:
import React from "react";
and:
export default App;
scripts
The scripts section contains commands that you can execute using npm.
For example:
"scripts": {
  "dev": "vite",
  "build": "vite build",
  "preview": "vite preview"
}
This means:
npm run dev
runs:
vite
And:
npm run build
runs:
vite build
dependencies
Dependencies are packages required by the application.
For example:
"dependencies": {
  "react": "...",
  "react-dom": "..."
}
devDependencies
Development dependencies are packages primarily needed while developing or building the project.
For example:
"devDependencies": {
  "vite": "..."
src Folder
The src folder is where most of your React application development takes place.
The name src generally means source.
As your application grows, this folder will contain:
- Components
- Pages
- Hooks
- Styles
- Utilities
- Services
- Context
- Application logic
- Assets
A small project may start with:
src/
├── assets/
├── App.css
├── App.jsx
├── index.css
└── main.jsx
Later, a larger project could look like:
src/
├── components/
├── pages/
├── hooks/
├── services/
├── utils/
├── context/
├── assets/
├── App.jsx
├── App.css
├── index.css
└── main.jsx
You should not create every possible folder immediately. Start with a simple structure and introduce new folders when the application becomes large enough to benefit from them.
Why Is src Important?
The src folder contains the code that makes your application work.
For example, if you create a navigation bar, you might eventually create:
src/
└── components/
    └── Navbar.jsx
If you create a dashboard page:
src/
└── pages/
    └── Dashboard.jsx
This organization makes larger React applications easier to maintain.
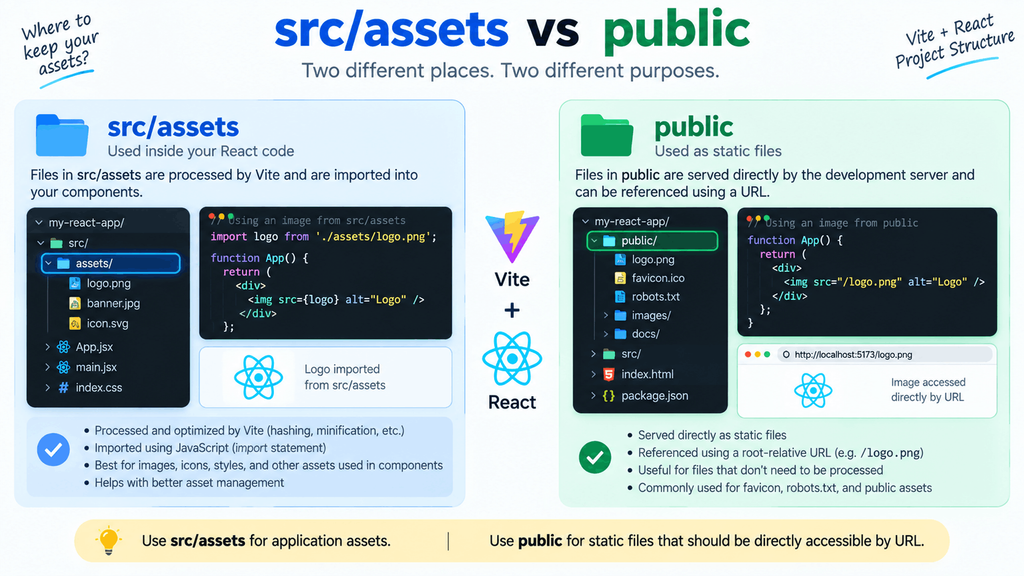
public Folder
The public folder is used for static files that need to be served directly.
For example:
public/
├── logo.png
├── favicon.ico
└── robots.txt
Files placed inside public are generally referenced using a root-relative URL.
For example, if you have:
public/logo.png
you can reference it as:
<img src="/logo.png" alt="Logo" />
When Should You Use public?
The public folder is useful for assets that you want to access by their direct URL and do not need to import into your JavaScript code.
However, many application assets can instead be placed inside src/assets.
public vs src/assets
public | src/assets |
|---|---|
| Served directly | Processed by the build system |
| Referenced using URLs | Usually imported into components |
| Useful for static public files | Useful for application assets |
| No import required | Usually imported |
For example, an image inside src/assets might be used like this:
import logo from "./assets/logo.png";

function App() {
  return <img src={logo} alt="Logo" />;
}
The correct choice depends on how the asset needs to be used.
main.jsx
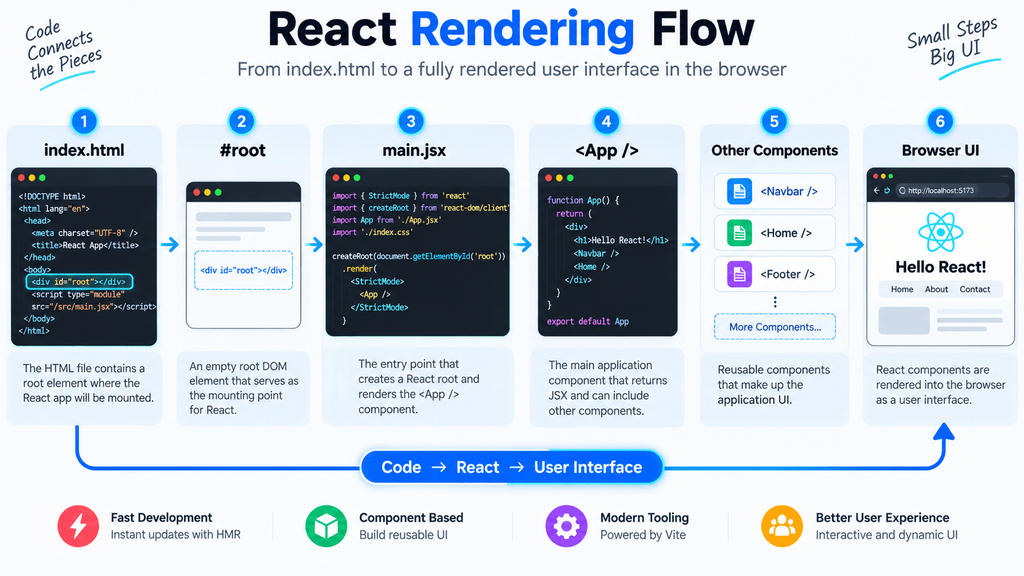
The main.jsx file is the entry point where the React application is connected to the HTML document.
A typical Vite React project contains code similar to:
import { StrictMode } from "react";
import { createRoot } from "react-dom/client";
import "./index.css";
import App from "./App.jsx";

createRoot(document.getElementById("root")).render(
  <StrictMode>
    <App />
  </StrictMode>
);
Let’s understand what is happening.
Importing createRoot
import { createRoot } from "react-dom/client";
createRoot is used to create a React root that controls part of the browser DOM.
Importing App
import App from "./App.jsx";
This imports the main App component.
Finding the root element
document.getElementById("root")
Vite’s index.html contains a root element similar to:
<div id="root"></div>
React uses that element as the location where the application is rendered.
Rendering App
createRoot(document.getElementById("root")).render(
  <App />
);
This tells React to render the App component inside the element with the ID root.
The basic flow is:
index.html
    ↓
<div id="root">
    ↓
main.jsx
    ↓
<App />
    ↓
React components
    ↓
User interface
This is one of the most important flows to understand when beginning React.
App.jsx
App.jsx is the main application component in a typical Vite React starter project.
It may initially contain a simple component such as:
function App() {
  return (
    <h1>Hello React!</h1>
  );
}

export default App;
Here, App is a React function component.
The function returns JSX:
<h1>Hello React!</h1>
The component is then exported:
export default App;
This allows another file, such as main.jsx, to import it:
import App from "./App.jsx";
Modifying App.jsx
You can replace the default content with your own UI.
For example:
function App() {
  return (
    <div>
      <h1>My First React Application</h1>
      <p>I am learning React with Vite.</p>
    </div>
  );
}

export default App;
Save the file and return to the browser.
If the Vite development server is running, the browser should automatically update.
This behavior is one of the advantages of modern development tooling and is commonly known as Hot Module Replacement, or HMR. Vite provides HMR during development.
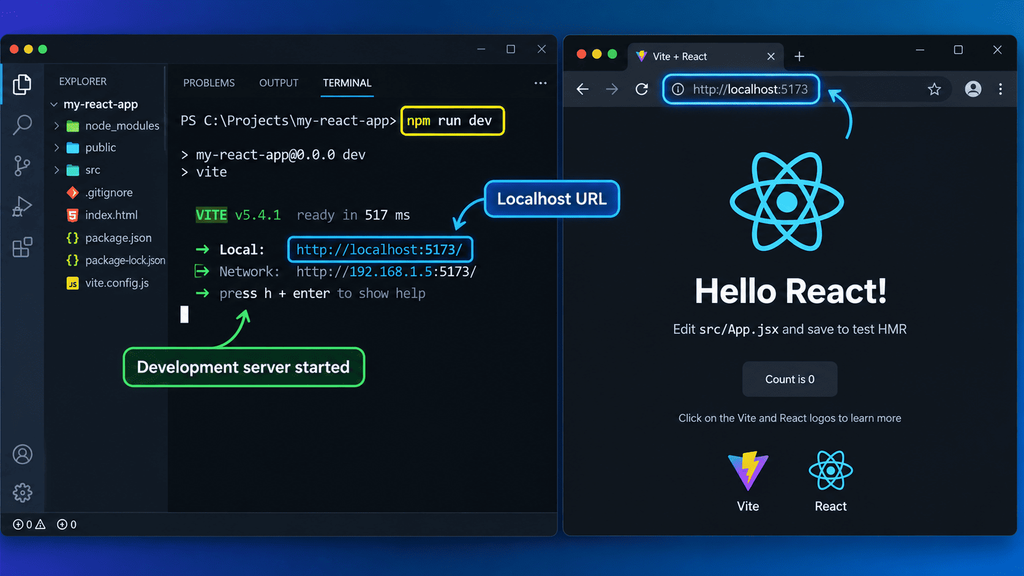
Run a React Application
Once your React project has been created and its dependencies installed, you can run it using:
npm run dev
Vite starts a development server and displays a local URL.
A typical output may look similar to:
VITE ready

Local: http://localhost:5173/
Open the local address in your browser.
Your React application should now appear.
What Happens When You Run npm run dev?
The process can be simplified like this:
npm run dev
      ↓
Vite starts
      ↓
Development server starts
      ↓
index.html loads
      ↓
main.jsx executes
      ↓
App.jsx is rendered
      ↓
React components appear
      ↓
Browser displays the application
This process happens very quickly, which is why you can edit your code and see changes almost immediately.
Making Changes
Open:
src/App.jsx
Change the component:
function App() {
  return (
    <h1>Welcome to My React App</h1>
  );
}

export default App;
Save the file.
Your browser should update automatically.
This creates a very useful development cycle:
Write Code
    ↓
Save
    ↓
Vite Detects Change
    ↓
React Updates
    ↓
Browser Refreshes/Updates
Build a React Application
Running a React application during development and building it for production are two different processes.
During development, you use:
npm run dev
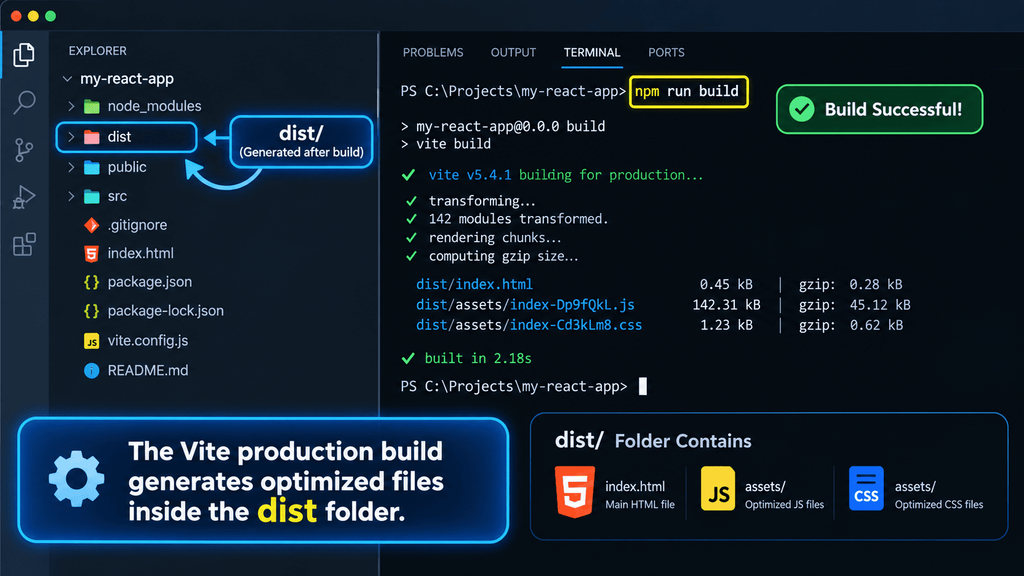
When you are ready to create an optimized production build, use:
npm run build
Vite’s build command creates optimized production assets from your application. Vite uses its build system to generate files suitable for deployment.
Running the Production Build
Run:
npm run build
You will typically see a new folder called:
dist/
Your project may now look similar to:
my-react-app/
│
├── node_modules/
├── public/
├── src/
├── dist/
│
├── index.html
├── package.json
├── package-lock.json
└── vite.config.js
The dist directory contains the production-ready output generated by Vite.
Development vs Production
| Development | Production |
|---|---|
npm run dev | npm run build |
| Used while coding | Used before deployment |
| Development server | Optimized output |
| Fast development workflow | Production assets |
| HMR available | Static build output |
Previewing the Production Build
After building the project, you can preview the generated production output using:
npm run preview
This allows you to inspect the production build locally before deploying it.
A typical workflow is:
npm run build
npm run preview
If the preview looks correct, you can deploy the generated output according to your hosting platform’s requirements.
Understanding the Complete React Setup
At this point, you have installed Node.js, learned npm and npx, created a React application using Vite, explored the project structure, and learned how to run and build your application.
The complete development workflow can be summarized as follows:
Install Node.js
      ↓
npm becomes available
      ↓
Create React + Vite project
      ↓
npm install
      ↓
Install project dependencies
      ↓
npm run dev
      ↓
Start development server
      ↓
Write React components
      ↓
Test application
      ↓
npm run build
      ↓
Generate production build
      ↓
Deploy application
This workflow forms the foundation of modern React development.
React Setup Commands Cheat Sheet
Keep the following commands available while learning React.
| Command | What It Does |
|---|---|
node -v | Checks Node.js version |
npm -v | Checks npm version |
npm create vite@latest | Creates a Vite project |
cd project-name | Opens the project directory |
npm install | Installs dependencies |
npm run dev | Starts the development server |
npm run build | Creates a production build |
npm run preview | Previews the production build |
npm install package | Installs a package |
npm uninstall package | Removes a package |
Common React Setup Mistakes
Beginners often encounter problems during setup. Most of them are straightforward to fix.
Node.js Is Not Installed
If you run:
node -v
and receive an error, install Node.js first.
Use the official Node.js website rather than downloading Node.js from an unknown source.
Node.js Version Is Too Old
Modern versions of Vite have specific Node.js requirements. If Vite reports that your Node.js version is unsupported, install a supported Node.js version. The current Vite documentation lists Node.js 20.19+ or 22.12+ as supported baselines.
Running npm Commands in the Wrong Folder
Suppose your project is:
Documents/
└── my-react-app/
    ├── package.json
    └── src/
You need to run:
cd my-react-app
before running:
npm run dev
npm uses the project’s package.json, so running commands from the wrong directory can produce errors.
Forgetting npm install
After creating or cloning a project, you may need to install its dependencies:
npm install
Without the required dependencies, commands such as:
npm run dev
may fail.
Confusing Development and Production
Remember:
npm run dev
is primarily for development.
npm run build
creates the production build.
They serve different purposes.
Frequently Asked Questions
Is Node.js required for React?
Node.js is not required to write every piece of React code, and React can also be experimented with directly in online environments. However, for a modern local React development workflow using tools such as Vite, Node.js is required. React’s documentation also provides browser-based ways to experiment with React without installing anything locally.
Is npm included with Node.js?
Yes. Installing Node.js normally provides npm as well. You can verify both installations using:
node -v
npm -v
Should I use Create React App?
For a new React project, no. Create React App has been deprecated. Modern React projects should use an appropriate framework or a modern build setup such as Vite when building a React application from scratch.
Is Vite a React framework?
No. Vite is a frontend build tool and development server. It can be used with React and several other frontend frameworks and libraries.
What is the difference between React and Vite?
React is the library used to build the user interface.
Vite provides development and build tooling around your application.
A simple way to remember it is:
React → Builds the UI

Vite → Helps develop and build the application
What is main.jsx?
main.jsx is typically the entry point of a Vite React application. It creates the React root and renders the main application component into the HTML element with the root ID.
What is App.jsx?
App.jsx is typically the main application component in a Vite React starter project. It acts as the starting point for the application’s component tree.
What is the src folder?
The src folder contains the application’s source code, including components, pages, styles, hooks, utilities, and other application logic.
What is the public folder?
The public folder contains static files that can be served directly without being imported into the JavaScript module graph.
What is package.json?
package.json contains important project information, npm scripts, and dependency definitions.
What is the difference between npm and npx?
npm is primarily used for managing packages and running project scripts, while npx is commonly used to execute package-provided commands without requiring a permanent global installation.